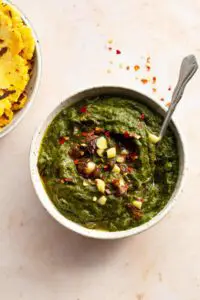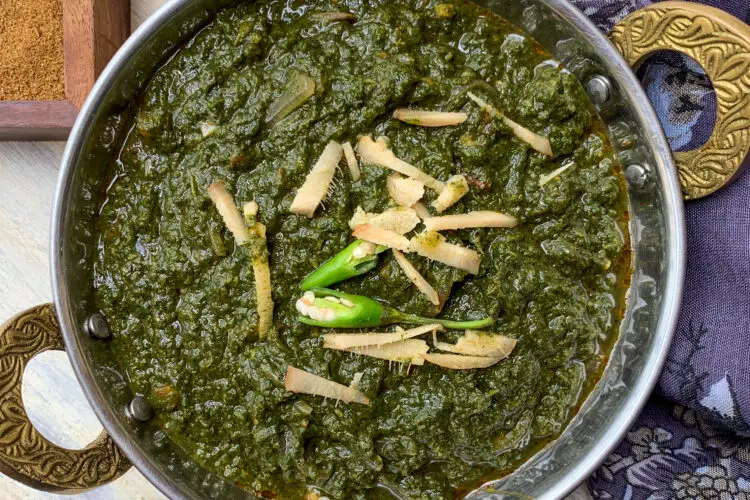
Sarson ka Saag is more than just a seasonal meal from North India; it evokes feelings. Fresh winter greens are used to create a creamy coarse sauce that is brimming with warm, rustic flavors. Onions, tomatoes, and spices are used to balance the greens. Serve it over hot Makki roti and a large amount of handmade butter.
Being a form of curry, Sarson ka saag is creamy, flavorful, and simply enticing. Although it can also be eaten with paratha and steamed basmati rice, traditionally it is served with an unleavened corn-based flatbread known as Makki di Roti.
Although the Sarson ka saag dish is simple, it does take a lot of time to prepare; for this reason, I like to spread out the procedures over a few days.
Ingredients for Sarson ka saag
- 250 grams of mustard greens
- 250 grams mixed greens like spinach, bathua (chenopodium)
- 2 tomatoes
- 1onion chopped
- 5-6 large garlic cloves chopped
- 2 green chilies
- 1/2 teaspoon red chili powder
- 1 teaspoon salt or to taste
- 2 tablespoons ghee
- 1/4 teaspoon hing
- 2 dried red chilies
- 1/2 teaspoon coriander powder
- 1/2 teaspoon garam masala
Instruction for Sarson ka saag
- To begin with, wash and chop all the greens. Then thoroughly wash or rinse the greens under running water.
-
Wash and chop the greens and then add them to the pressure cooker. Then add the chopped onion, garlic, ginger, and green chilies.
- tomato and white radish to the mix. Salt and red chili powder are then added. Stir in 1.5 cups of water.
- In a conventional stovetop pressure cooker, cook everything on high heat for 5–6 whistles, or until everything is soft and cooked.
- Open the pressure cooker/instant pot, then purée the saag with an immersion blender. If you don’t have an immersion blender, let the mixture cool somewhat before pureeing with a standard blender.
-
Blend to a coarse paste. You may blend it to a super fine texture using a high-speed blender. I prefer it little coarse.
- Saag should be moved to another pot on the stovetop with medium heat. Two tablespoons of maize flour added to the saag and mixed can assist the saag in becoming thicker.
-
Set heat to low and let the saag simmer for 20 to 25 minutes on low heat. It will thicken as it simmers.
- A small pan should be heated to medium heat for the last tadka. When the pan is hot, add the ghee, followed by the hing and the minced garlic. Add the chopped onion and dried red chilies after a brief period of sautéing.
-
Cook until the onions and garlic turn light golden brown. Add the coriander powder and garam masala and mix.
- Mix the tadka/tempering with the saag after adding it.
- With Makki roti, chopped onion, jaggery, and white butter serve Sarson ka saag!
Tips and variations
Leafy greens frequently have mud and grime on them. Before boiling the leaves, thoroughly wash them under running water to remove all contaminants.
Sarson da saag usually has a coarse, creamy texture. I like to achieve this using a stick blender in place of the usual mixture grinder. A stick blender allows for better control and helps me attain that beautiful coarse texture every time.
When preparing a significant quantity, store the leftover saag in the refrigerator in an airtight container without tempering. This saag dish freezes well for up to a month and keeps well for up to 4 days in the refrigerator.
Serving Suggestions
Serve the hot Sarson ka saag straight away, preferably with Makki di roti and a few jaggery cubes by the side – nothing beats this combination. You can also serve Sarson da saag with paratha and steamed rice.
Pair this meal combination of the saag and Makki ki roti with a side of freshly chopped onions and green chilies if you like.
Nutrition
| Calories | 40 kcal |
| Carbohydrates | 6g |
| Proteins | 2g |
| Fat | 1g |
| sodium | 81mg |
| fiber | 2g |
| sugar | 1g |
| Vitamin A | 361IU |
| Vitamin C | 6mg |
| Calcium | 9mg |